

How to Season Your Cast Iron Dutch Oven: A Complete Guide
Why does a piece of gear designed to last for generations often end up at the back of the cupboard after just one rusty camping trip? It’s a common frustration; you spend an evening under the stars only to wake up to a pot covered in orange spots or stubborn, burnt-on food. Learning how to season a cast iron dutch oven is more than just a chore. It’s a foundational bushcraft skill that transforms a heavy hunk of metal into a non-stick, rust-proof heirloom that actually improves with age!
We know that maintaining outdoor gear should be rewarding, not a source of confusion. You want kit that performs every time you’re out in the field. This guide promises to demystify the process, from choosing the best oils available in the UK to mastering the science of polymerisation. We’ll walk you through the essential steps to achieve a slick, professional finish. You will gain the confidence to maintain your favourite cookware for a lifetime of adventures.
Key Takeaways
- Master the science of polymerisation to create a hard, non-stick surface that improves every time you cook.
- Follow our clear, step-by-step guide on how to season a cast iron dutch oven to protect your investment from rust.
- Identify the best oils to use in the UK based on their smoke points for a professional, long-lasting finish.
- Learn the truth about using mild detergent and how a quick post-cook routine keeps your seasoning intact.
- Discover the essential handling gear you need to manage high heat safely whilst cooking over an open fire.
What is Cast Iron Seasoning and Why Does Your Dutch Oven Need It?
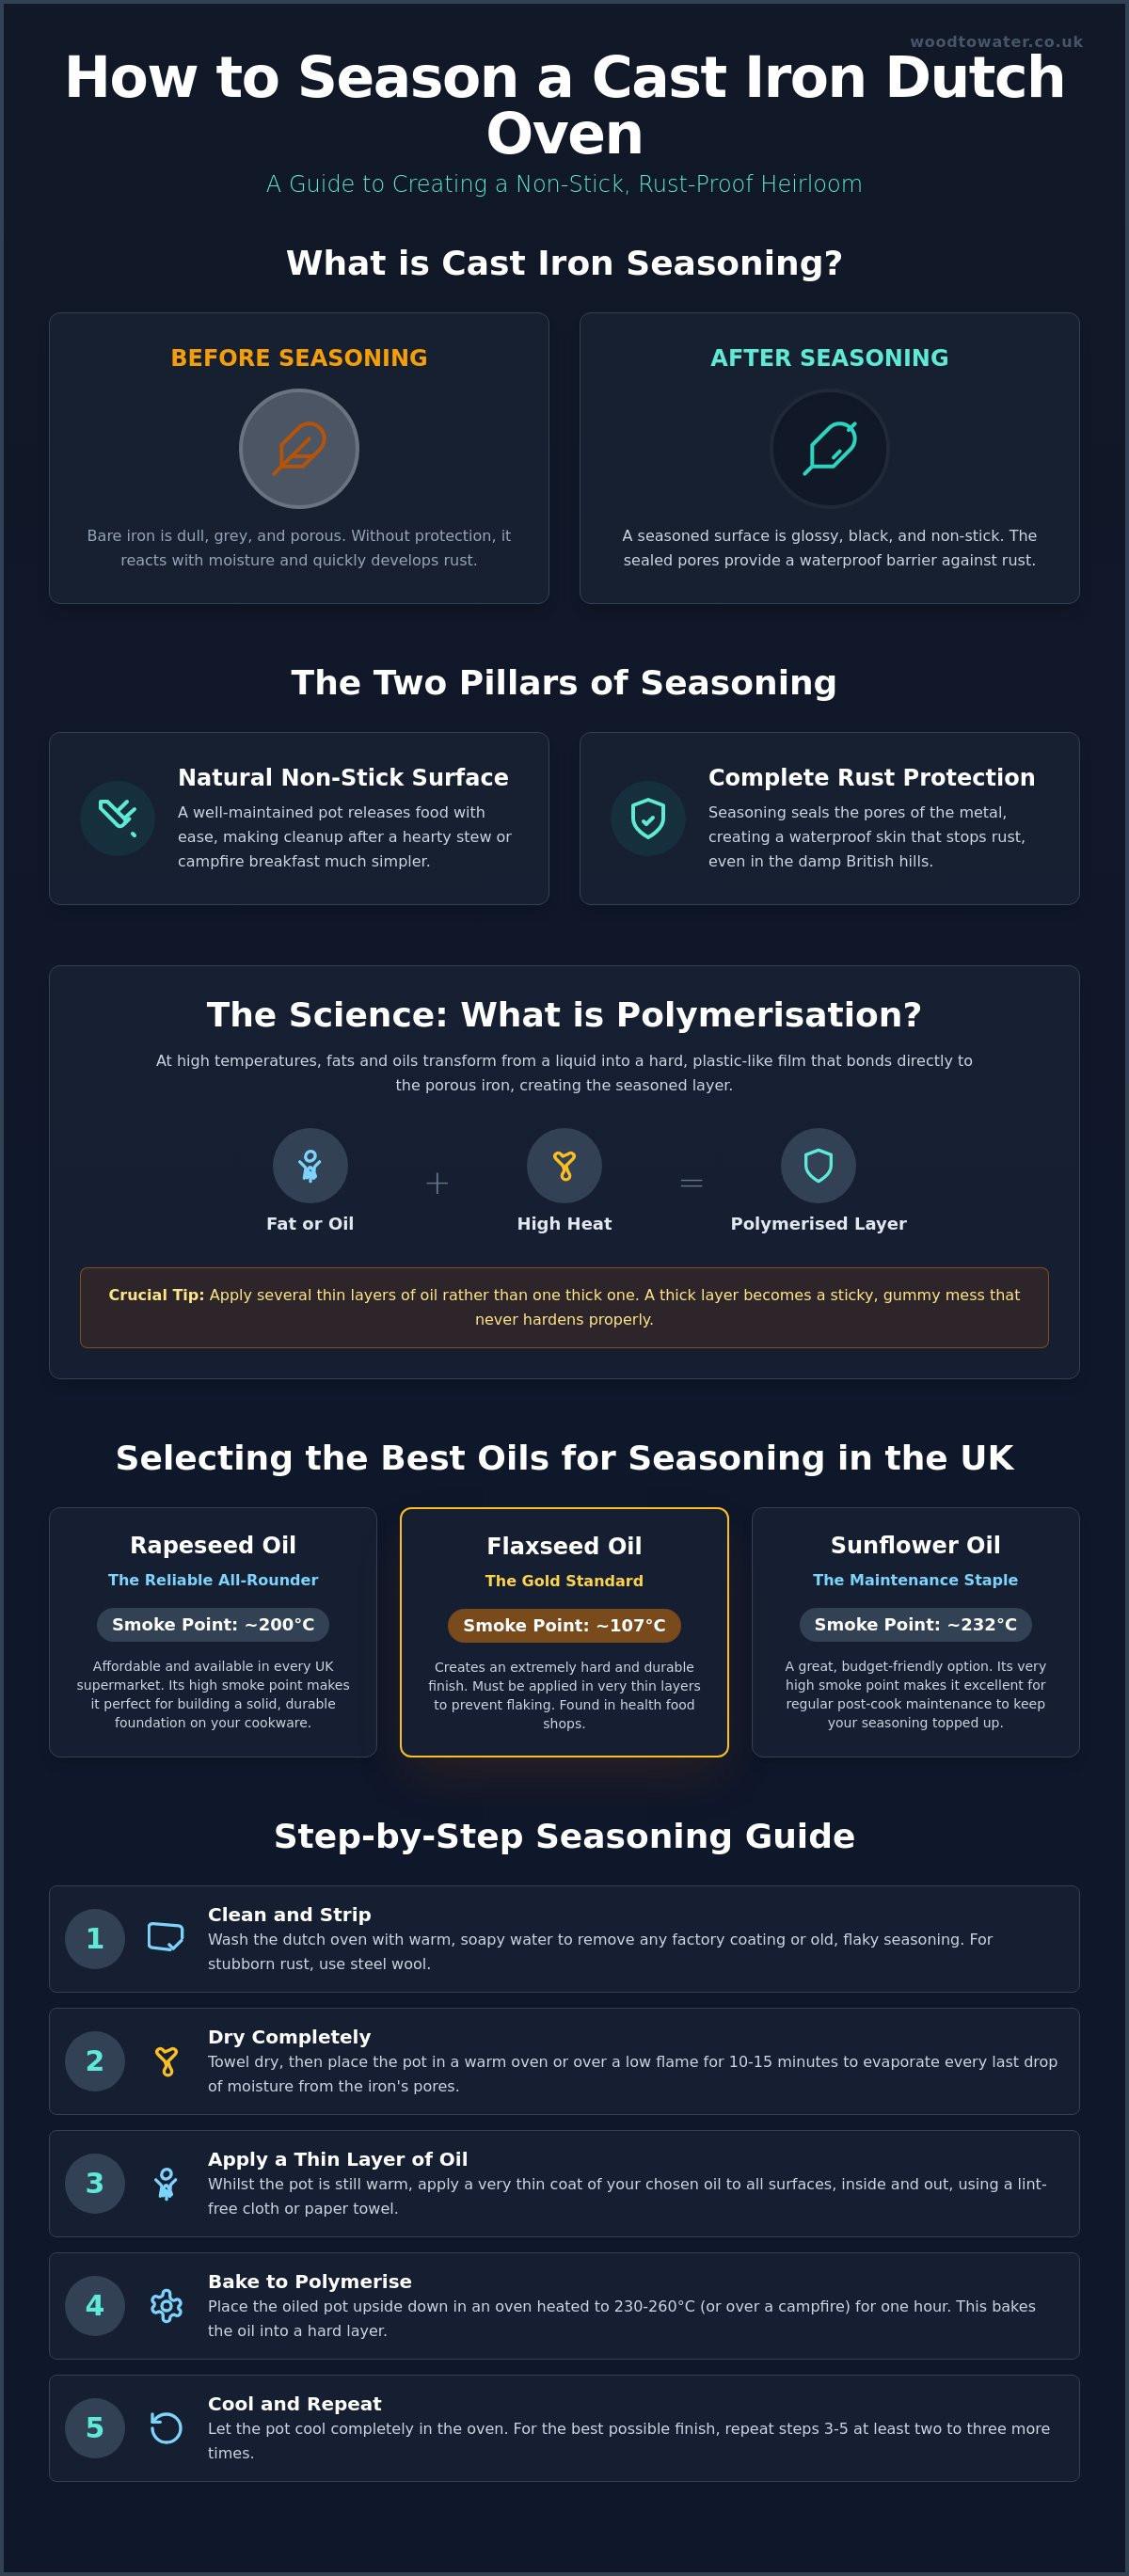
Seasoning isn't about salt, pepper, or herbs. In the world of outdoor cooking, it refers to the process of bonding oil to the surface of your metal through intense heat. When you learn how to season a cast iron dutch oven, you're essentially creating a custom-fit, natural non-stick coating. Unlike modern synthetic pans that eventually peel or flake, this seasoned layer is self-healing. Every time you cook with fat, you’re reinforcing that barrier. It’s a waterproof skin that stops the iron from reacting with moisture in the air; this is essential if you're camping in the damp British hills.
The Wikipedia entry on What is Cast Iron Seasoning explains that this process is vital for any ferrous cookware. It provides two massive benefits for the camp chef:
- Natural Non-Stick: A well-maintained pot releases food easily, making cleanup after a heavy stew much simpler.
- Rust Protection: Bare iron hates water. Seasoning seals the pores of the metal, preventing the dreaded orange glow of rust from appearing after one rainy night.
A seasoned pot is naturally PFOA-free. You don't have to worry about chemicals leaching into your food at high temperatures. It's just iron and oil. This makes it a sustainable choice that lasts for generations, unlike modern coatings that have a limited lifespan.
This appreciation for durable, well-made items often extends from the campsite back to the home. Much like a seasoned pot, high-quality timber features from Arborfield Joinery are built to last a lifetime, combining traditional techniques with modern durability.
The Science of Polymerisation
At high temperatures, fats and oils undergo a chemical transformation called polymerisation. Basically, the oil stops being a liquid and turns into a hard, plastic-like film that bonds directly to the porous iron. It’s best to apply several thin layers rather than one thick one. Thick layers often result in a sticky, gummy mess that never quite hardens. This traditional approach is quite different from using lightweight TOAKS Titanium Cookware. While titanium is brilliant for moving fast and light, it doesn't hold a seasoned non-stick layer like iron does. For the best slow-cooked roasts, iron is king.
New vs. Old: Does Your Pot Need Seasoning?
Most modern pots arrive "factory seasoned", which is a great start. However, adding your own layer at home gives you a much better foundation. You can tell if your pot needs attention by looking at the colour. A healthy dutch oven is deep black and glossy. If it looks grey, dull, or has patches of rust, it’s time to strip it back and start again. You can use the "water bead test" to check your current seasoning integrity; if water droplets don't roll off the surface like they do on a freshly waxed car, your protection is failing. Knowing how to season a cast iron dutch oven correctly ensures your gear is always ready for the next expedition.
Selecting the Best Oils for Seasoning in the UK
Choosing the right fat is the most important decision you'll make when learning how to season a cast iron dutch oven. It isn't just about what's in the larder; it's about the "smoke point". This is the temperature at which an oil stops being a liquid and starts to break down and smoke. To achieve polymerisation, your oven needs to be hotter than the oil's smoke point. If you use an oil with a low smoke point, like extra virgin olive oil, it will burn off or become brittle before it ever bonds to the iron. We want an oil that creates a tough, flexible film that can handle the heat of a roaring campfire.
High-polyunsaturated fats are the best candidates for this job. They contain the right chemical structure to cross-link into a solid surface. Whilst some oils might seem interchangeable, their performance varies wildly. If an oil isn't fully polymerised, it can go rancid. This happens when the fat molecules react with oxygen without being bonded to the metal; it results in a sticky surface that smells distinctly unpleasant the next time you open the lid. Following a trustworthy Step-by-Step Seasoning Guide will help you manage these temperatures effectively.
Top UK Oil Choices and Their Smoke Points
- Rapeseed Oil (UK Canola): This is the reliable, high-smoke-point all-rounder. It’s available in every UK supermarket and is very affordable. With a smoke point around 200°C, it’s perfect for building a solid foundation.
- Flaxseed Oil (Edible Linseed): Often called the "gold standard", this oil creates a very hard finish. You’ll find it in health food shops. Be careful, though; if you apply it too thickly, it can flake off like old paint.
- Vegetable or Sunflower Oil: These are accessible, budget-friendly options. They work well for regular maintenance and are likely already in your kitchen cupboard.
If you're starting with a fresh set of cast iron cookware, using rapeseed oil is usually the safest bet for a consistent, durable result.
Traditional Fats: Lard and Beef Dripping
Before modern vegetable oils were a staple, bushcraft enthusiasts and home cooks relied on animal fats. Lard and beef dripping provide a beautiful, dark finish and a nostalgic scent. They are excellent options for those learning how to season a cast iron dutch oven using traditional methods. These fats are highly effective, but they come with a caveat. Because animal fats can spoil, you must ensure they are fully polymerised through high heat. If you're seasoning in the wild, you can render fat from your cooking meat to keep the iron protected. Just remember to keep the layers thin and the heat consistent.
Step-by-Step Guide: How to Season Your Dutch Oven at Home
Ready to get your hands dirty? Learning how to season a cast iron dutch oven at home is a straightforward process, but it requires patience and plenty of fresh air. It's going to get smoky. Before you begin, open every window in the kitchen and ensure your extractor fan is on full blast. This isn't just about the smell; it's about the chemistry of oil reaching its smoke point. You want to create a controlled environment where the oil can bond to the metal without setting off every smoke alarm in the house.
Preparing the Iron
Start by giving your pot a thorough scrub. Use a stiff brush or a chainmail scrubber to remove any factory wax, old food debris, or surface rust. This is the only time we recommend using warm, soapy water. Once clean, you must get the iron "bone dry". Even a tiny amount of moisture trapped in the pores of the metal will lead to rust forming under your new seasoning. The most effective way to ensure this is by placing the pot on a camping gas stove or a kitchen hob for a few minutes until all the water has evaporated.
When the iron is warm but still touchable, apply a tiny amount of your chosen fat. Use a piece of kitchen roll to buff the oil into every nook and cranny, including the handle and the outside of the lid. Here is the secret: wipe it all off again. You want to buff the pot until it looks completely dry. If you can see a visible shine, there's too much oil. As noted in this guide on the Best Oils for Seasoning, multiple thin layers are the only way to achieve a hard, non-sticky finish that won't flake away.
The Baking Process
Preheat your oven to between 230°C and 250°C. This high heat is necessary to trigger the polymerisation process. Place your Dutch oven upside down on the middle rack. This simple trick prevents any excess oil from pooling in the bottom of the pot, which would create a sticky, uneven mess. Place a baking tray on the rack below to catch any stray drips. Bake the pot for at least one hour.
Once the time is up, turn the oven off but do not open the door. Leaving the iron to cool slowly inside the oven prevents metal stress and allows the bond to set perfectly. Whilst a kitchen oven provides the most consistent results for a base layer, you can replicate this over a campfire by using a bed of hot coals and a lid covered in embers. However, the oven remains the gold standard for your initial seasoning. Mastering how to season a cast iron dutch oven this way ensures your gear is ready for any weather the British countryside throws at it.
Post-Cook Maintenance: Keeping Your Cast Iron in Peak Condition
The hard work doesn't end once the initial seasoning is complete. Maintaining your gear is what separates a rusty relic from a lifelong companion. If you've just mastered how to season a cast iron dutch oven, don't let that effort go to waste by neglecting it after a meal. The secret to success is the "Wash, Dry, Oil" cycle. You should aim to clean your pot whilst it's still warm from the fire. Use hot water and a stiff plastic brush to remove food particles. It’s a simple habit that pays massive dividends in the long run.
Let’s debunk a common myth: the "no soap" rule. In the old days, soaps contained harsh lye that would strip away your hard-earned seasoning instantly. Modern UK washing-up liquids are far gentler. A tiny drop of mild detergent won’t kill a well-polymerised layer. It’s actually better to use a little soap than to leave old grease to go rancid. However, you must avoid the dishwasher at all costs. The high-pressure water and harsh chemicals will destroy the surface and invite rust to take hold almost overnight.
Dealing with Stubborn Food
Sometimes a slow-cooked chilli leaves behind stubborn, burnt-on bits. Don't reach for the steel wool; that's too aggressive. Instead, try a salt scrub. Pour a generous amount of coarse sea salt into the pot and use a dry cloth to buff away the debris. The salt acts as a natural abrasive that cleans without gouging the iron. If the food is truly stuck, add an inch of water and bring it to a boil on your stove. The heat and steam will loosen the residue safely. Whatever you do, never soak your cast iron in the sink overnight. Water is the enemy of iron, and soaking is the fastest way to ruin your seasoning.
Long-term Storage and Rust Prevention
The British climate is notoriously damp, which can be a nightmare for metal gear stored in sheds or garages. Before putting your pot away, ensure it is 100% dry by heating it on the hob for a minute. Apply a very thin maintenance layer of oil whilst the metal is still warm. This is essentially a mini-lesson in how to season a cast iron dutch oven; it reinforces the barrier against moisture. For storage, place a folded paper towel between the pot and the lid to allow airflow. This prevents moisture from being trapped and stops the oil from smelling musty. Using a dedicated carry bag for your cast iron cookware adds an extra layer of protection against the elements.
Ready to put these skills to the test? Browse our full selection of cast iron cookware and find the perfect centrepiece for your outdoor kitchen.
Elevating Your Outdoor Kitchen: Essential Gear for Dutch Oven Cooking
Once you’ve mastered how to season a cast iron dutch oven, you possess a piece of kit that is truly bombproof. It becomes the undisputed centrepiece of a serious bushcraft essentials kit. Whether you’re baking sourdough over glowing embers or simmering a stew through a rainy afternoon, the Dutch oven is your most reliable companion. However, the pot is only half the story. To cook safely and effectively in the wild, you need the right supporting gear to handle the extreme heat that cast iron is famous for retaining.
Your choice of heat source will dictate your cooking style. Traditional campfires offer a rustic experience and high heat, but they require constant attention. For more precise baking, many enthusiasts prefer charcoal briquettes. They provide a steady, predictable temperature that makes it easier to avoid scorching your hard-earned seasoning. Whichever you choose, remember that the goal is to maintain that slick surface you worked so hard to create during the seasoning process.
Must-Have Accessories
- Lid Lifters: Never rely on a stray stick or a pair of pliers to check your food. A dedicated lid lifter provides a secure T-bar grip. This prevents the lid from tipping and dumping ash directly into your dinner.
- Heat-Resistant Gloves: Heavy-duty leather gloves are non-negotiable. Cast iron doesn't just get hot; it stays hot for a very long time. Proper protection allows you to move the pot or adjust the lid without a trip to the first aid kit.
- Tripods: If you're cooking over an open fire, a tripod is a game-changer. It allows you to hang the pot at the perfect height, giving you total control over the simmer rate.
- Chainmail Scrubbers: As we discussed in the maintenance section, these are the best investment for longevity. They remove burnt food without stripping the polymerised oil layer you’ve built up.
Expanding Your Collection
Most people start with a standard 4.5 or 6-litre pot, which is perfect for feeding a small group. As your confidence grows, you might find yourself looking for different sizes. Smaller pots are brilliant for side dishes or individual portions, whilst massive 10-litre ovens are the king of the basecamp feast. Many modern designs also feature a "lid as a griddle" function. By flipping the lid over onto a stand, you have a perfectly seasoned flat-top for frying eggs or searing steaks. It’s this kind of versatility that makes cast iron so addictive.
Building a collection of quality iron is a journey that lasts a lifetime. Now that you know how to season a cast iron dutch oven and keep it in peak condition, you're ready to take your camp cooking to the next level. Explore our full range of Cast Iron Cookware at Wood To Water and start your seasoning journey today!
Ready for a Lifetime of Campfire Feasts?
You’ve now got the knowledge to turn a simple piece of iron into a legendary cooking tool. By understanding the science of polymerisation and selecting the right UK-sourced oils, you’ve moved beyond guesswork. Remember that the "Wash, Dry, Oil" routine is what keeps that non-stick surface in peak condition for your next trip. Mastering how to season a cast iron dutch oven isn't just about maintenance; it’s about ensuring your gear is always ready for the wild.
At Wood To Water, we live for the outdoors. We’ve expertly curated our bushcraft gear to ensure every item meets our high standards. If you have any questions about your kit, our UK-based customer support team is always ready to help. Plus, with national delivery for outdoor enthusiasts, your new favourite pot is only a few clicks away.
Browse our hand-picked Cast Iron Cookware collection and start building your outdoor kitchen today. There’s nothing quite like the smell of a slow-cooked meal over a real fire. We can't wait to see what you create!
Frequently Asked Questions
Can I season my Dutch oven on a campfire instead of a kitchen oven?
Yes, you can season your pot over a fire, but it’s much harder to control the heat than in a kitchen. Place the oiled pot over a bed of hot coals and put embers on the lid to create an even temperature. Whilst this is a great bushcraft skill, using a kitchen oven for the initial foundation is usually more reliable for a perfect finish.
Why is my Dutch oven sticky after seasoning?
Stickiness is almost always caused by applying too much oil or not heating the pot for long enough. If the oil doesn't fully polymerise into a hard film, it leaves a gummy residue. To fix this, scrub the pot with hot water and bake it in the oven at 230°C for another hour to harden the remaining fat.
How do I remove rust from a cast iron Dutch oven?
You can remove surface rust by scrubbing the affected areas with a stiff brush, chainmail scrubber, or fine steel wool. Scrub until you see the dull grey of bare iron, then wash and dry the pot immediately on a hob. You must then follow the full process of how to season a cast iron dutch oven to seal the metal and prevent the rust from returning.
What is the best oil to use for seasoning in the UK?
Rapeseed oil is the most reliable and accessible choice in the UK due to its high smoke point and affordability. It creates a tough, flexible layer that won't easily flake. Flaxseed oil is another popular "gold standard" option found in health shops, but it can be prone to flaking if you apply the layers too thickly.
How often should I re-season my cast iron?
You don't need to do a full oven seasoning very often if you follow a good maintenance routine. Most enthusiasts find that a dedicated session once or twice a year is plenty. Regular cooking with fats and oils naturally reinforces the surface, so the more you use your pot, the better the non-stick layer becomes.
Is it okay to use dish soap on a seasoned Dutch oven?
Yes, a small amount of mild washing-up liquid is perfectly safe for a well-seasoned Dutch oven. Modern UK soaps are much gentler than the lye-based cleaners of the past. A quick wash won't strip your polymerised oil layer, but you should never put cast iron in a dishwasher or leave it to soak in the sink.
Why is my seasoning flaking off in black bits?
Flaking usually happens when oil layers have been applied too thickly or if the seasoning has become brittle over time. These black bits are just carbonised oil, not the iron itself. To fix it, scrub away the loose flakes with a stiff brush and apply a very thin maintenance layer of oil to smooth out the surface.
Can I use a Dutch oven on a gas camping stove?
Absolutely, a Dutch oven works brilliantly on a gas camping stove for stews, soups, and frying. Just be mindful of hot spots, as gas burners concentrate heat in the centre of the pot. Knowing how to season a cast iron dutch oven ensures the base remains protected even when exposed to the direct, intense flame of a portable burner.